The Feinwerkbau manual isn't bad but a well made video on the AW 93 trigger adjustment would be most welcome.
Has anybody uncovered one?
So far I've only found this older thread:
viewtopic.php?f=4&t=12110&start=20
On page 2, post by Walter, but he says he goes by memory which leaves doubts.
Adjusting the FWB AW93 Trigger.
Moderators: pilkguns, m1963, Isabel1130
-
Christopher Miceli
- Posts: 324
- Joined: Sun Aug 21, 2016 6:11 am
- Location: Haymarket, VA
Re: Adjusting the FWB AW93 Trigger.
What kind of trigger are you trying to achieve ?
this process works for a true 2 stage.
Here's how I set my trigger up. I hope it's of some help.
first, run out the triggerstop screw 22. Then run out screw 26 in back of the frame. I set the trigger slack as short as can be and still be very safe, by turning screw 20 until the gun when the slide is cycled with the trigger held down will drop the hammer. Then back it off to a comfortable safety distance and reset the screw 26 again. Repeat this procedure until you get the firststage as short as you feel comfortable, while still having the screw 26 have a just a hair of slack so that the bar drops into the groove consistantly when you take your finger off the trigger.
Set trigger point screw 21 to the right until the second stage goes away, and then back it to the left until it feels somewhat crisp. This is the important screw that lets you have a rolling release or a crisp release.
Here's where I found the most difficulties, if the second stage weight is too light, it won't give a consistant feel to the letoff when it's set crisp. I was getting a sort of slight bump feel from the edge of the second stage sear when it was set too light, which went away as the second stage weight was increased a little. When the second stage feels right, that's when to set the letoff slightly crisper. I then set the first stage weight to legal spec. Then I set the screw 26 in back of the frame again so that the bar has that slight hair of slack again. Then set trigger stop back enough so that the sear won't drag.
I hope that makes sense, as right now I'm just going from memory and the manual for the screw numbers.
I think the biggest area of concern is to set the second stage weight high enough to put some pressure on the parts.
Even though the trigger is simple in its workings, I did also have a hell of a time messing with it until I got it feeling right, and now I ain't touchin it again.
Hope this helps.
—Walt
Re: Adjusting the FWB AW93 Trigger.
Check out the true two-stage X-Line trigger I've installed on my 1911. Page 3 here:
http://www.bullseyeforum.net/t4435p50-i ... ne+trigger
The FWB has obviously a lot more capabilities built into it. It came with a 2lb and a long take-up out of the box.
http://www.bullseyeforum.net/t4435p50-i ... ne+trigger
The FWB has obviously a lot more capabilities built into it. It came with a 2lb and a long take-up out of the box.
Re: Adjusting the FWB AW93 Trigger.
I've only adjusted the 1st stage weight on my AW93 (screw 25). That didn't require loosening of trigger stop screw (22) or any other adjustment. I set my 1st stage up for ~ 2.2 lb with the second stage (as it came from the factory) at ~ 0.6 lb. I use an older RCBS spring scale for measurements, so I can't say anything about how precise these weights are but they are consistent (or, I can measure them consistently).
I appreciate the two stage trigger, since that is how the mechanism is designed. As a two stage trigger, with a slight amount of 'roll' in the second stage, I find it very consistent. I've set-up all my other .22 two stage triggers similarly.
Unfortunately, I'm not a Youtube video maker nor have I found any videos on adjusting triggers. I expect that is from liability and 'nothing is fool proof'. Plus our litigious culture is always a concern.
As an incessant tinkerer, the only advise I can give is to be methodical, take notes on the number of screw turns and direction so the assembly can be restored to it's original configuration, and try to understand the design so that adjustments cause predictable results. With regard to understanding the design, I am a firm believer that an elephant can never be disguised as a monkey no matter how elaborate the disguise (and recognize some adamantly disagree). As such, trying to turn an AW93 two stage trigger into a single stage trigger (regardless of of what is written about adjustments) is a bad plan and will never result in an excellent single stage trigger. Whereas, adjusting the trigger for two stage operation is relatively straightforward and yields an excellent (IMO) trigger. I recognize some will adamantly disagree.
p.s. I recommend getting a set of proper metric slotted screwdrivers, so the screw heads don't get buggered up and eventually need replacement: https://www.wihatools.com/tech-tools/pr ... nvas-pouch
Re: Adjusting the FWB AW93 Trigger.
Thanks Stan. I'm printing this and placing it at the head of the bench.
I'm not trying for a one-stage, just a slight adjustment of the two-stage which came out of the box heavier than yours.
Cracks me up that my FAS Chiappa 604 came out of the box with the most incredible trigger that I've ever shot for any money. And then they went ahead and discontinued it and stopped supporting it.
Re: Adjusting the FWB AW93 Trigger.
FWIW, if I were to do a more elaborate trigger adjustment, trying to get the desired trigger configuration using screws #20-25 would be done first. The manual says this in that "if the trigger slack and trigger point have been adjusted properly" before adjusting screw #26, but the sequence of adjustment in the manual does not imply this (IMO). Also screw #26 requires removing the grips with the hope being the previous owner was not that thorough and the factory setting still remains. Counting turns of known screw numbers goes a long way to resetting the trigger when things don't work out as expected. Good luck!
Edit: while the AW93 trigger is not identical to the Pardini trigger, the design is similar (IMO). Here is a link from the bullseye forum on the Pardini trigger and it's adjustment in a post by Chris Miceli (images from Doug White here on Targettalk.org). The trigger bar (or 'rod' in the AW93 manual) pushes the sear away from the hammer instead of pulls (which is the case for Hammerli and several others). The distinction to push the sear allows getting a general visual idea about the purpose of the pivot pins and screws #20-24 in the AW93. Link: http://www.bullseyeforum.net/t9239-pard ... gger-issue
Edit II: after a bit more pondering, I would only touch screws #24 (trigger point weight) and #25 (trigger slack weight) first and see how the resulting trigger felt before adjusting screws #20-23. I'm keeping this as notes to myself in case I want to do this some day.
-
Christopher Miceli
- Posts: 324
- Joined: Sun Aug 21, 2016 6:11 am
- Location: Haymarket, VA
Re: Adjusting the FWB AW93 Trigger.
turn them all till you get what you want =] thats what i did
Re: Adjusting the FWB AW93 Trigger.
After the motto more screws more better, something you said about guns and which I use every chance I get.
Re: Adjusting the FWB AW93 Trigger.
OK Stan. I want to do just this - screws 24 and 25 being the easiest ones to access- but ... the manual says on p.14, and emphasizes by placing a box around it10M_Stan wrote: Edit II: after a bit more pondering, I would only touch screws #24 (trigger point weight) and #25 (trigger slack weight) first and see how the resulting trigger felt before adjusting screws #20-23. I'm keeping this as notes to myself in case I want to do this some day.
Note: Before any adjustment of the trigger, the triggerstop screw (22 - covered by the trigger shoe) must be unscrewed to the left for about three turns.
As if this warning weren't sufficient, it is repeated on p. 18.
What is your opinion? Ignore it and proceed with 24 and 25 anyway or observe the Befehl?
Re: Adjusting the FWB AW93 Trigger.
The manual is explicit, but not clear. I think it is the German->English translation. Maybe not. Either way, I have turned screws #25 and #24 without slackening #22 with no ill effects. Also, and this gets back into the translation, trigger slack weight (1st stage) and trigger point weight (2nd stage) are not described as adjustments. If cutaways are examined, it's clear that screw #25 only changes the pre-load on the trigger-bar spring. Screw #24 is a bit less obvious but also acts on the trigger bar.
Of course, I could be wrong and FWB really meant that the trigger stop screw #22 should be loosened three turns before doing anything to the trigger. But I don't see any obvious reason necessary to loosen the trigger stop screw when adjusting the trigger weight. FWB makes a nice pistol, but they need better manual writers (IMO).
I am a student of target pistol triggers, so the similarities between the Pardini and AW93 are notable to the point that the AW93 trigger can be adjusted per the instructions for the Pardini, provided the names of the screws are interchanged.
Here is a cut-away of the AW93 trigger from the TenP files provided by Pilkguns:
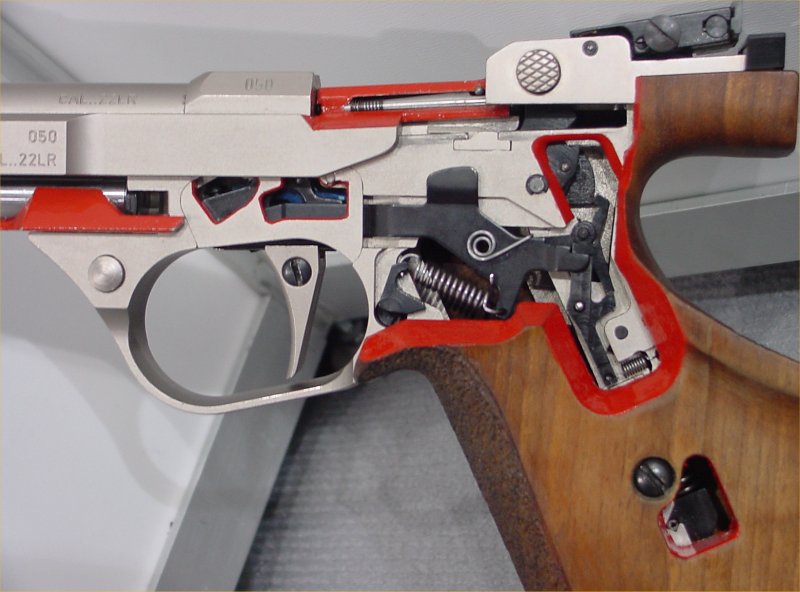
Also, here is the link to the TenP file for the AW93, which describes adjusting the 1st and 2nd stage trigger weight by turning screws with no need to slacken the trigger stop screw: http://www.pilkguns.com/tenp/spfwb93.htm
I shouldn't really complain about the AW93 manual, since it's really quite detailed. Also, my manual which came with the AW93 is easier to read than the PDF version online and the trigger bar and associated linkages are easier to discern. That is, once the distinction is made that the trigger bar pushes the sear from the hammer (i.e. moves towards the back strap).
Several posts, including this one (http://www.targettalk.org/viewtopic.php?f=4&t=46983) describe turning screw #26 as a first step. Viewing the basic design as one similar to the Pardini trigger, I disagree and see turning screw #26 as the last screw to turn, and one that must be adjusted with some consideration on how the entire trigger mechanism operates. Of course, that is just my opinion.
Of course, I could be wrong and FWB really meant that the trigger stop screw #22 should be loosened three turns before doing anything to the trigger. But I don't see any obvious reason necessary to loosen the trigger stop screw when adjusting the trigger weight. FWB makes a nice pistol, but they need better manual writers (IMO).
I am a student of target pistol triggers, so the similarities between the Pardini and AW93 are notable to the point that the AW93 trigger can be adjusted per the instructions for the Pardini, provided the names of the screws are interchanged.
Here is a cut-away of the AW93 trigger from the TenP files provided by Pilkguns:
Also, here is the link to the TenP file for the AW93, which describes adjusting the 1st and 2nd stage trigger weight by turning screws with no need to slacken the trigger stop screw: http://www.pilkguns.com/tenp/spfwb93.htm
I shouldn't really complain about the AW93 manual, since it's really quite detailed. Also, my manual which came with the AW93 is easier to read than the PDF version online and the trigger bar and associated linkages are easier to discern. That is, once the distinction is made that the trigger bar pushes the sear from the hammer (i.e. moves towards the back strap).
Several posts, including this one (http://www.targettalk.org/viewtopic.php?f=4&t=46983) describe turning screw #26 as a first step. Viewing the basic design as one similar to the Pardini trigger, I disagree and see turning screw #26 as the last screw to turn, and one that must be adjusted with some consideration on how the entire trigger mechanism operates. Of course, that is just my opinion.
Re: Adjusting the FWB AW93 Trigger.
Thanks Stan and I very much appreciate your patience.
I asked George Brenzovich, he was quite categorical about all trigger adjustments having to start with screw #22 and one expects him to know the issue in some depth.
I suspect that Haidurov's original XP-64 design may have been quite a bit simpler to adjust.
I asked George Brenzovich, he was quite categorical about all trigger adjustments having to start with screw #22 and one expects him to know the issue in some depth.
I suspect that Haidurov's original XP-64 design may have been quite a bit simpler to adjust.
-
Gregbenner
- Posts: 196
- Joined: Fri May 20, 2016 1:03 am
Re: Adjusting the FWB AW93 Trigger.
Thx for this Chris. Jon spent a few minutes adjusting the trigger on mine, best it has ever been! Finally I can actually feel stage 2.
Christopher Miceli wrote:What kind of trigger are you trying to achieve ?
this process works for a true 2 stage.
Here's how I set my trigger up. I hope it's of some help.
first, run out the triggerstop screw 22. Then run out screw 26 in back of the frame. I set the trigger slack as short as can be and still be very safe, by turning screw 20 until the gun when the slide is cycled with the trigger held down will drop the hammer. Then back it off to a comfortable safety distance and reset the screw 26 again. Repeat this procedure until you get the firststage as short as you feel comfortable, while still having the screw 26 have a just a hair of slack so that the bar drops into the groove consistantly when you take your finger off the trigger.
Set trigger point screw 21 to the right until the second stage goes away, and then back it to the left until it feels somewhat crisp. This is the important screw that lets you have a rolling release or a crisp release.
Here's where I found the most difficulties, if the second stage weight is too light, it won't give a consistant feel to the letoff when it's set crisp. I was getting a sort of slight bump feel from the edge of the second stage sear when it was set too light, which went away as the second stage weight was increased a little. When the second stage feels right, that's when to set the letoff slightly crisper. I then set the first stage weight to legal spec. Then I set the screw 26 in back of the frame again so that the bar has that slight hair of slack again. Then set trigger stop back enough so that the sear won't drag.
I hope that makes sense, as right now I'm just going from memory and the manual for the screw numbers.
I think the biggest area of concern is to set the second stage weight high enough to put some pressure on the parts.
Even though the trigger is simple in its workings, I did also have a hell of a time messing with it until I got it feeling right, and now I ain't touchin it again.
Hope this helps.
—Walt