Need some help understanding the instructions from my IZH manual Isee below for actual instructions. Also, do not know if I have my concepts straight. Assume you are instructing a mechanical idiot.
Thanks in advance.
On a three stage trigger
1) Preliminary Trigger creep
I assume that is the soft part of the trigger pull that gets taken up before dropping the gun into positin
I turn the screw which way (assuming I am looking down on screws with the gun upside down) to lengthen this, which way to shorten it?
2) Resrerve Trigger Creep (Screw directly behind the trigger)
I assume this is the part of the trigger scqueeze the results in the actual click.
Again to lengthen this I turn the screw...?
3) Final trigger creep
Is this before or after the click?
Again to lengthen this I turn the screw...?
Also...what is the best way to maximize the smoothness of the trigger. It seems a bit rough as of late (or maybe I am getting overly sensitive)
Instructions from PDF manual:
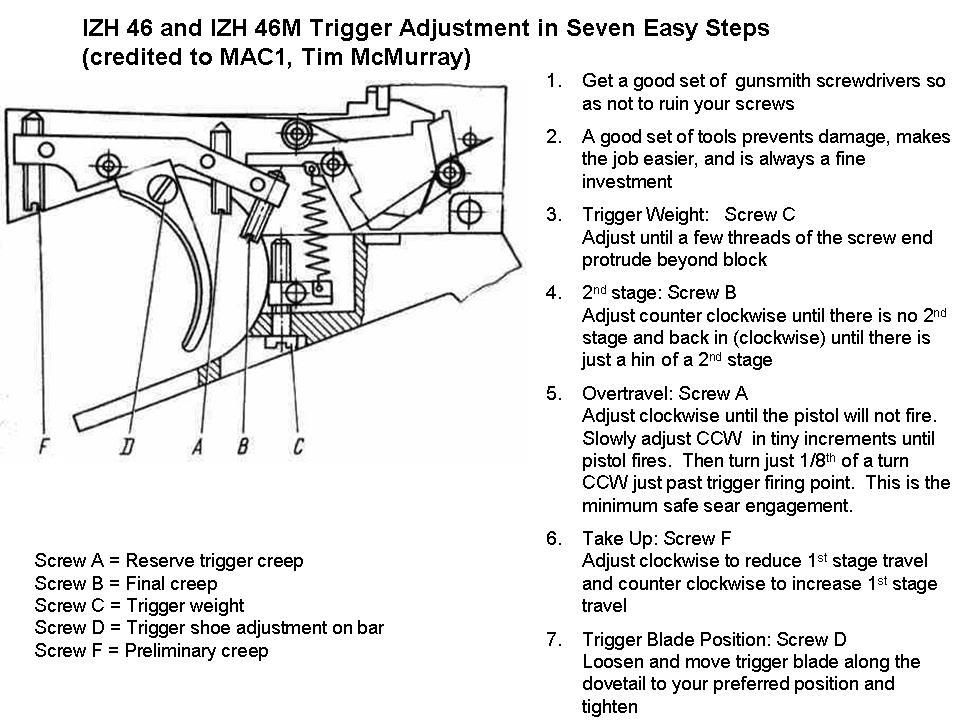
The screw directly behind the trigger is for adjusting reserve
trigger creep (see Figure 2); the next screw toward
the back is for adjusting final trigger creep (see Figure
3); the screw in front of the trigger is for adjusting
preliminary trigger creep (see Figure 4); the screw in
the trigger is for adjusting the distance of the trigger
with reference to the grip (see Figure 5); and the
screw closest to the back of the pistol is for adjusting
trigger pull (see Figure 6).
IZH 46 Triggrt Adjustment--need help
Moderators: pilkguns, m1963, David Levene, Spencer, Richard H
Forum rules
If you wish to make a donation to this forum's operation , it would be greatly appreciated.
https://www.paypal.com/paypalme/targettalk?yours=true
If you wish to make a donation to this forum's operation , it would be greatly appreciated.
https://www.paypal.com/paypalme/targettalk?yours=true
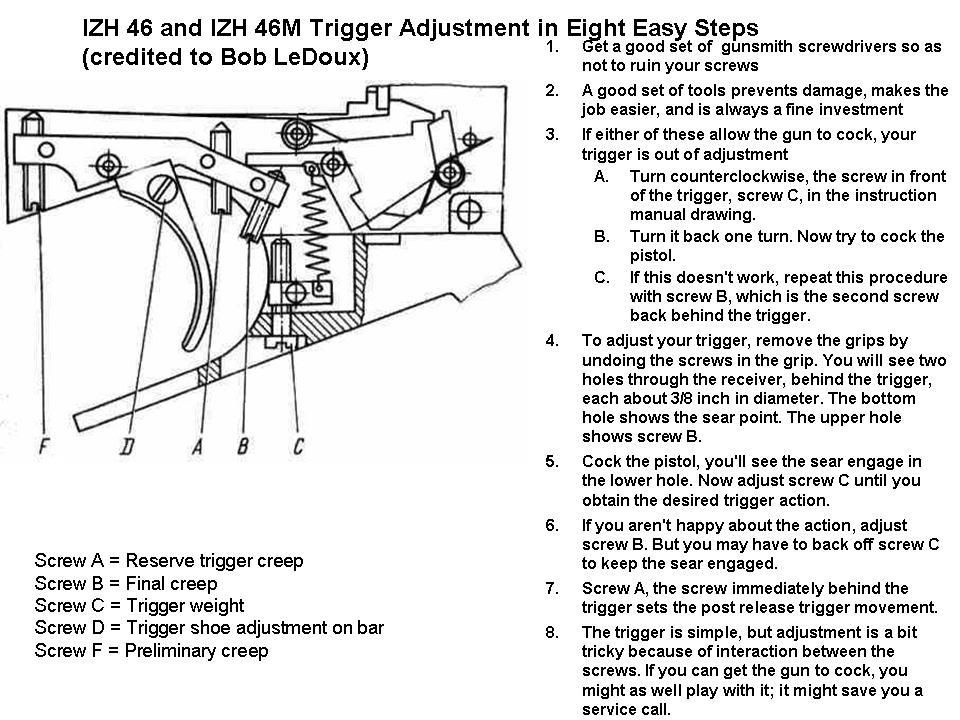
Screw F (your screw 1) is for what I call pretravel or freeplay since there is no spring used here. Turn screw F clockwise (CW) to decrease the amount of freeplay. Be careful here because turning the screw too far CW actually starts to apply pressure to the sear (just like pulling the trigger!).
Screw A (your screw 2) is for what I call overtravel, or how much the trigger moves after the shot breaks, but before it hits the stop. (Screw A actually is the stop.) Most shooters like the overtravel to be fairly short. Turn screw A CW to decrease the movement of the trigger after the shot breaks. You don't want to set this too fine because it may prevent the shot from being fired. Generally you set this screw like this: Cock the gun as if dry firing (no pellet). Turn screw A CW far enough that the gun doesn't click when you pull the trigger. Then start backing off on screw A CCW as you pull the trigger until the gun just clicks (fires). Then back off another 1/4 turn or so for safety.
Screw B (your screw 3) is for second stage creep or sear engagment. Don't mess with this screw-leave it at the factory setting or you risk making the gun unsafe. If you do adjust it, be very careful. Turning screw B CW decreases the sear engagement which is just like pulling the trigger.
If your trigger is rough, I would do no more than applying a dab of oil to the sear. You can see the sear interface through a hole in the frame when the grips are removed. Beyond that you should probably send it in for professional service.
Be careful. If my instructions are not clear, come back and perhaps someone else can explain it better.
FYI, here is a somewhat related thread: viewtopic.php?t=14956&highlight=

To make it easy, just disassemble grip, and look at the sear engagement directly through hole in the frame.
Proceding from front to rear screw:

Screw F = First stage length
Turn clockwise to decrease first stage travel. Control the engagement from the hole on frame.
Screw D = Trigger shoe adjustment on bar
Screw A = Reserve trigger creep
Turn clockwise to decrease travel after the shot break. Follow istructions of the post up, with dryfiring or the shot do not break.
Screw B = Final creep (second stage lenght)
Turn clockwise to decrease sear engagement, control it through the hole under the grip. Do not reduce it too much or the gun became unsafety.
Screw C = Trigger weight
Turn clockwise to increase trigger pull.
Before touching sear engagement, check your finger position: it must be free to move without altering grip hold. If not, move the trigger to make finger squeezing it easy.
Check trigger weight, and set it (for p10 competition) at least at 500 grams, set it 530 more or less to be sure.
With the use, my trigger on izzy became more fluid. I spray two drops of gun-oil on sear engagement.
For a new shooter it is probably better to leave the trigger adjustments untouched-especially sear engagement.
Be carefully, touching trigger set up you can make the gun unsafe or the the trigger very little pleasant. Proceed turning screw 1/4 turn at times, the setting is very sensitive and after 1/4 turn check the trigger change with dryfire. Do not make it on hurry. When you set trigger a times, you must be ok for a long time.
Proceding from front to rear screw:
Screw F = First stage length
Turn clockwise to decrease first stage travel. Control the engagement from the hole on frame.
Screw D = Trigger shoe adjustment on bar
Screw A = Reserve trigger creep
Turn clockwise to decrease travel after the shot break. Follow istructions of the post up, with dryfiring or the shot do not break.
Screw B = Final creep (second stage lenght)
Turn clockwise to decrease sear engagement, control it through the hole under the grip. Do not reduce it too much or the gun became unsafety.
Screw C = Trigger weight
Turn clockwise to increase trigger pull.
Before touching sear engagement, check your finger position: it must be free to move without altering grip hold. If not, move the trigger to make finger squeezing it easy.
Check trigger weight, and set it (for p10 competition) at least at 500 grams, set it 530 more or less to be sure.
With the use, my trigger on izzy became more fluid. I spray two drops of gun-oil on sear engagement.
For a new shooter it is probably better to leave the trigger adjustments untouched-especially sear engagement.
Be carefully, touching trigger set up you can make the gun unsafe or the the trigger very little pleasant. Proceed turning screw 1/4 turn at times, the setting is very sensitive and after 1/4 turn check the trigger change with dryfire. Do not make it on hurry. When you set trigger a times, you must be ok for a long time.
-
Chris__Colorado
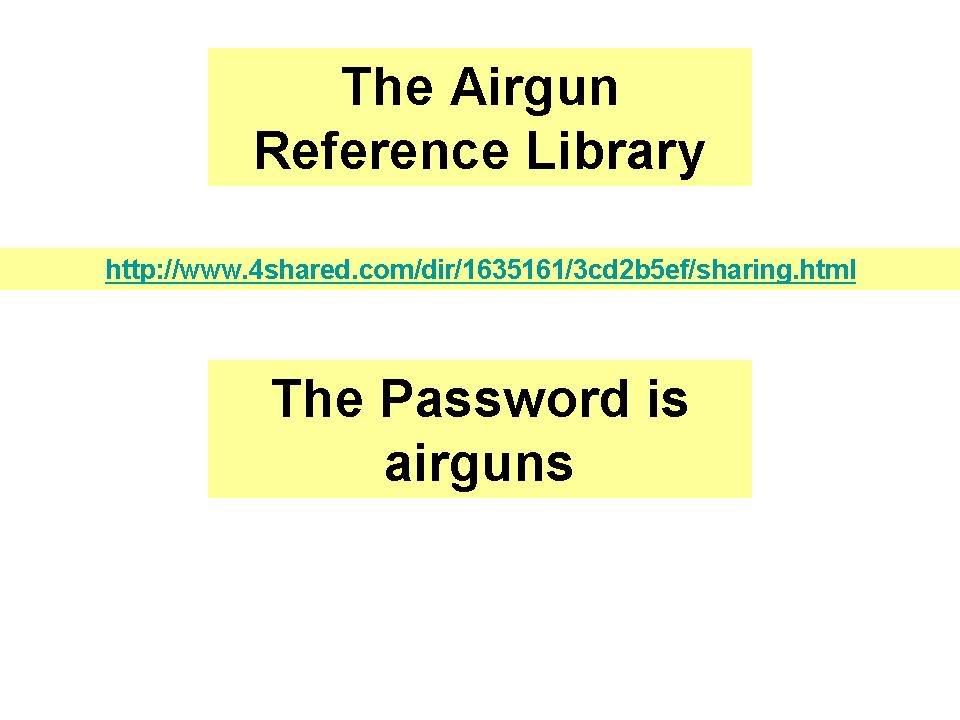
Instructions are at the Airgun Reference Library
The Airgun Reference Library has two procedures for adjusting triggers
http://www.network54.com/Forum/79537/thread/1175918158/
Both work well.
Hope this helps.
Chris
http://www.network54.com/Forum/79537/thread/1175918158/
Both work well.
Hope this helps.
Chris
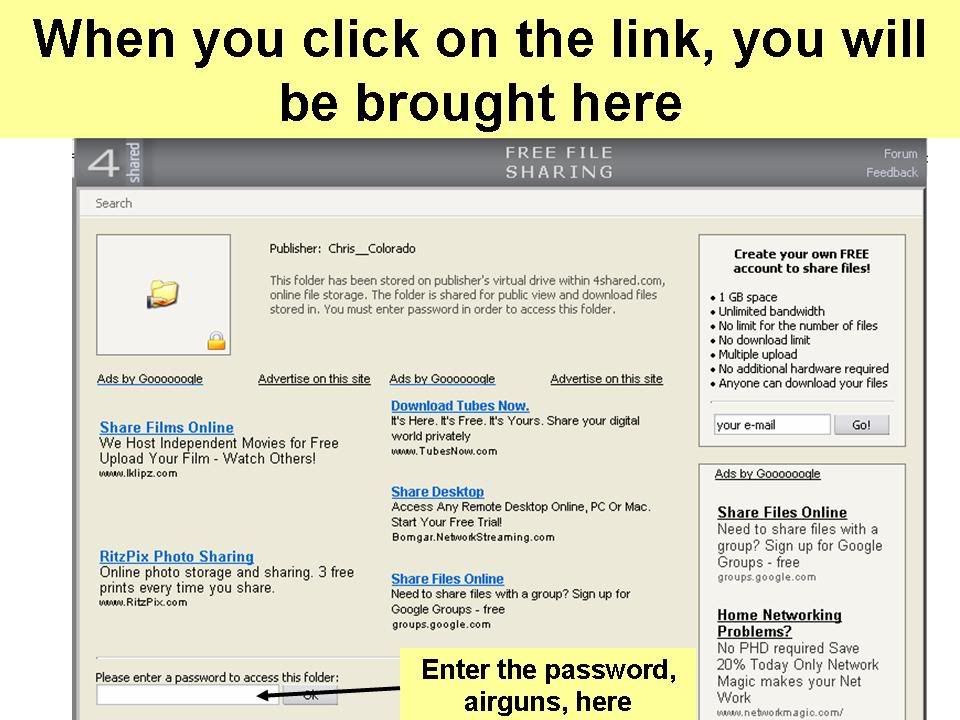
Re: Instructions are at the Airgun Reference Library
I cannot open sharing link.... !?Chris__Colorado wrote:The Airgun Reference Library has two procedures for adjusting triggers
http://www.network54.com/Forum/79537/thread/1175918158/
Both work well.
Hope this helps.
Chris
Can you post here or send me pm's files ?
Thank you.
Best regards,
LukeP
-
Chris__Colorado
46 Trigger Adjustment Files
Gentlemen,
Try the Airgun Reference Library Link again. It seams there were problems with the server earlier.
http://www.network54.com/Forum/79537/thread/1175918158/
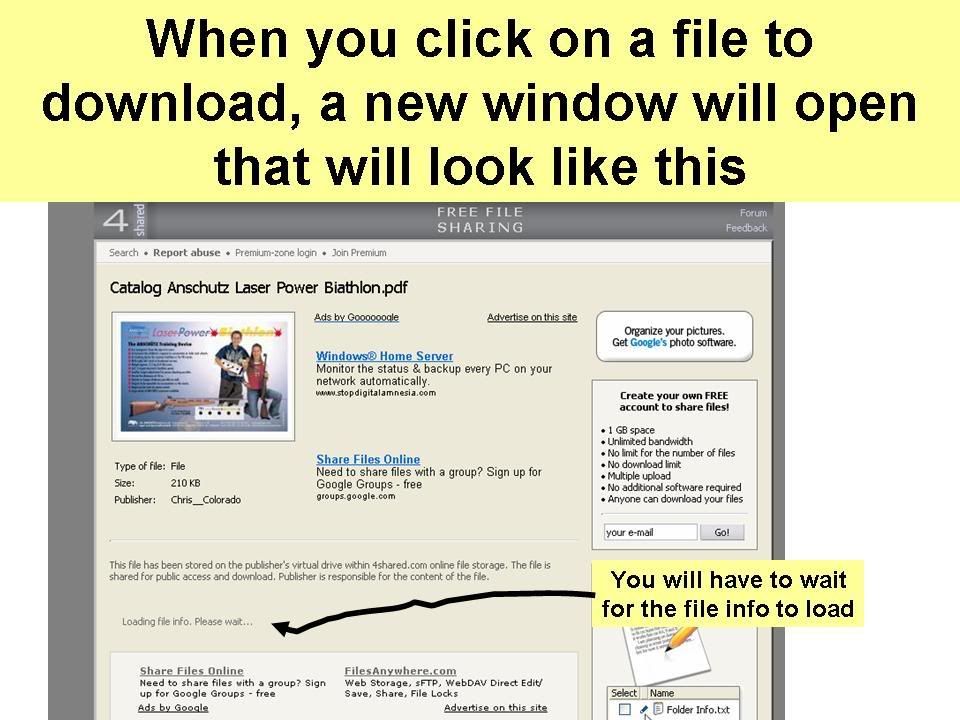
Here are the links to the five image files from the powerpoint presentation at the Airgun Reference Library. I don't know if it will work, but will give it a try.
http://i125.photobucket.com/albums/p64/ ... Slide2.jpg
http://i125.photobucket.com/albums/p64/ ... Slide3.jpg
http://i125.photobucket.com/albums/p64/ ... Slide4.jpg
http://i125.photobucket.com/albums/p64/ ... Slide5.jpg
http://i125.photobucket.com/albums/p64/ ... Slide1.jpg
http://i125.photobucket.com/albums/p64/ ... ide2-1.jpg
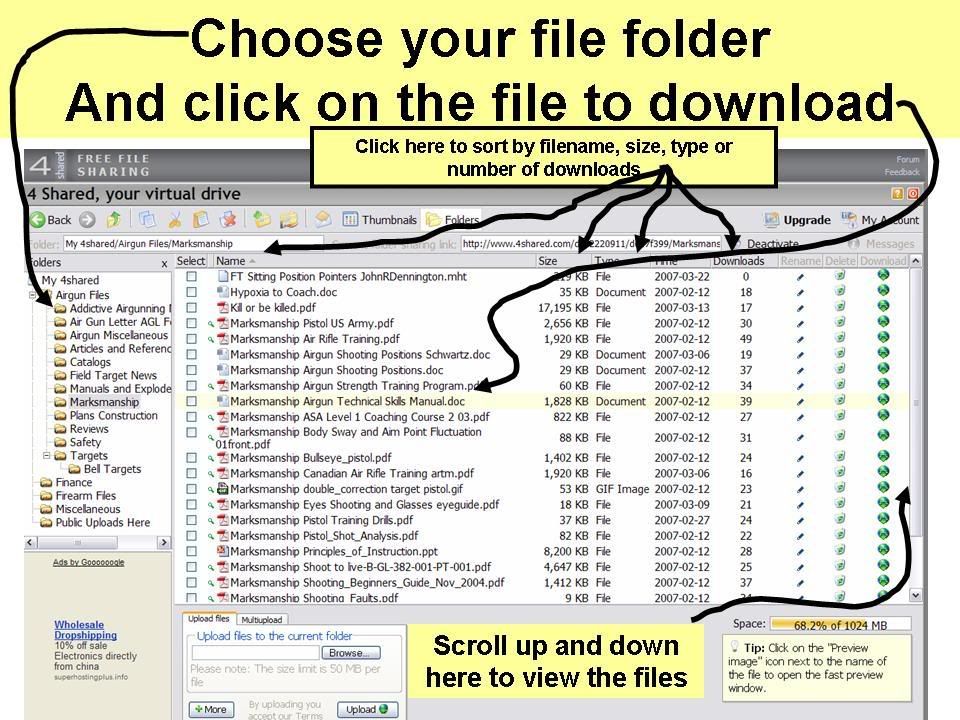
**** The easiest way to see updates is to remember the last time you visited the Airgun Reference Library. Then, just sort by the TIME column to see the posting that happened after you last visit. Please donate and share your information by uploading to the Public Uploads Folder. I will then download to my computer to keep a copy and place it in the appropriate Airgun Reference Library Folder. Thank you. ******
http://i125.photobucket.com/albums/p64/ ... ide3-1.jpg
http://i125.photobucket.com/albums/p64/ ... ide4-1.jpg
http://i125.photobucket.com/albums/p64/ ... ide5-1.jpg
Try the Airgun Reference Library Link again. It seams there were problems with the server earlier.
http://www.network54.com/Forum/79537/thread/1175918158/
Here are the links to the five image files from the powerpoint presentation at the Airgun Reference Library. I don't know if it will work, but will give it a try.
http://i125.photobucket.com/albums/p64/ ... Slide2.jpg
http://i125.photobucket.com/albums/p64/ ... Slide3.jpg
http://i125.photobucket.com/albums/p64/ ... Slide4.jpg
http://i125.photobucket.com/albums/p64/ ... Slide5.jpg
http://i125.photobucket.com/albums/p64/ ... Slide1.jpg
http://i125.photobucket.com/albums/p64/ ... ide2-1.jpg
**** The easiest way to see updates is to remember the last time you visited the Airgun Reference Library. Then, just sort by the TIME column to see the posting that happened after you last visit. Please donate and share your information by uploading to the Public Uploads Folder. I will then download to my computer to keep a copy and place it in the appropriate Airgun Reference Library Folder. Thank you. ******
http://i125.photobucket.com/albums/p64/ ... ide3-1.jpg
http://i125.photobucket.com/albums/p64/ ... ide4-1.jpg
http://i125.photobucket.com/albums/p64/ ... ide5-1.jpg